Introduction
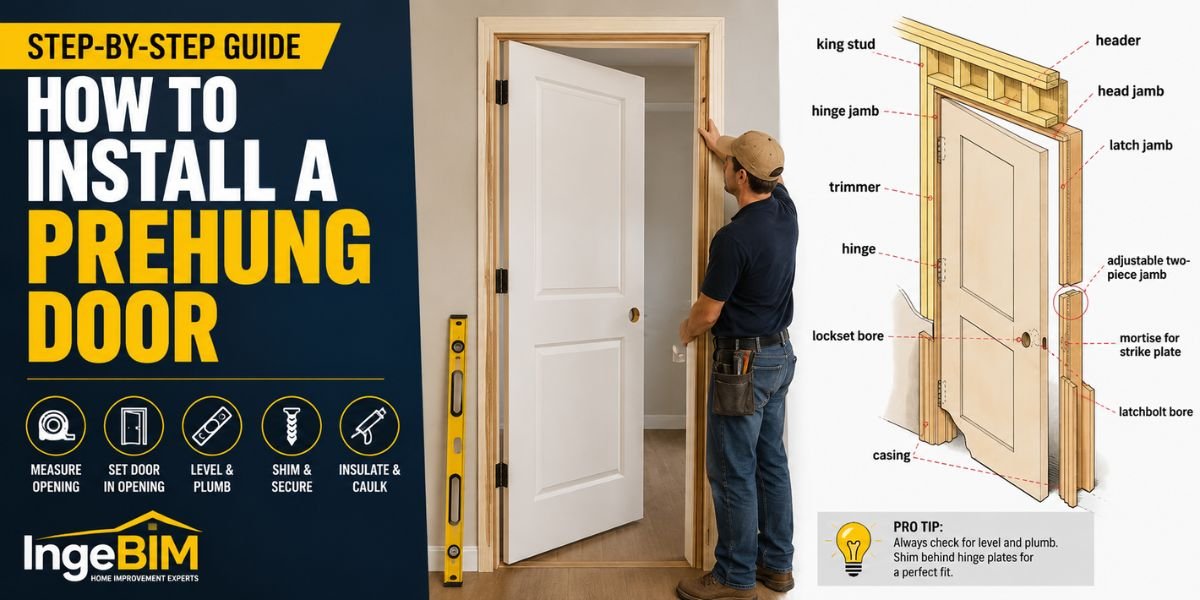
A prehung door is one of the easiest ways to replace an old, damaged, or poorly fitting door because it comes already mounted inside a new frame. Instead of trying to align separate hinges and jambs, you install the entire door assembly at once, making the process faster and more accurate.
Although installing a prehung door requires careful measuring and leveling, it’s a project many homeowners can complete with basic tools and patience.
This guide explains every step—from removing the old door to making the final adjustments—so you can achieve professional-looking results.
Before installing a new door, inspect the existing frame carefully. If it’s cracked, rotted, or loose, repair it first. Our How to Repair a Door Frame guide explains how to restore a solid foundation before beginning installation.
Quick Answer
Installing a prehung door involves removing the old door and frame, preparing the rough opening, positioning the new prehung unit, shimming and leveling the frame, securing it with screws, insulating the gaps, and testing the door for smooth operation.
What Is a Prehung Door?
A prehung door is a complete door system that includes:
- The door slab
- Hinges
- Door jamb
- Frame
- Weatherstripping (on many exterior models)
Because everything is factory-aligned, installation is usually easier than fitting a slab door into an existing frame.
Benefits of a Prehung Door
Installing a prehung door offers several advantages:
- Easier alignment
- Faster installation
- Improved energy efficiency
- Better security
- Smoother door operation
- Factory-installed hinges
For damaged or outdated doors, replacing the entire assembly is often more reliable than repairing individual components.
If your existing door only has minor alignment problems, a full replacement may not be necessary. Our How to Adjust Door Hinges guide can help you correct common alignment issues before deciding to install a new prehung door.
Tools and Materials
You’ll need:
Tools
- Tape measure
- Level
- Hammer
- Drill/driver
- Utility knife
- Pry bar
- Screwdriver
- Wood shims
- Caulking gun
Materials
- Prehung door
- Construction screws
- Expanding foam insulation
- Exterior caulk (for exterior doors)
- Finish nails
- Wood shims
Having everything ready before you begin makes installation much smoother.
Step 1: Remove the Old Door
Begin by removing the existing door.
- Open the door halfway.
- Remove the hinge pins.
- Lift the door away.
- Remove trim carefully.
- Unscrew the old frame.
- Pull the frame out without damaging the surrounding wall.
Inspect the rough opening before moving on.
If you’re replacing an older door because of worn hinges rather than frame damage, you may be able to solve the problem without installing a new unit. Our How to Replace Door Hinges guide explains when hinge replacement is the better option.
Step 2: Inspect and Prepare the Rough Opening
Before installing the new unit, check the opening carefully.
Inspect for:
- Rotting wood
- Moisture damage
- Loose framing
- Uneven flooring
- Incorrect opening size
Repair any structural problems before continuing.
If your old door was difficult to close because it stuck against the frame, make sure the rough opening is square before installing the new unit. Our How to Fix a Door That Sticks guide explains the common causes of sticking doors and how to prevent the same issue from happening again.
Step 3: Position the Prehung Door
Carefully lift the new prehung door into the opening.
- Center the frame.
- Check that it sits flush.
- Insert temporary shims.
- Confirm the frame remains level.
Do not fully secure the frame until you’ve checked alignment from every angle.
Step 4: Shim and Level the Door
Proper shimming is one of the most important steps in a successful prehung door installation. Even a high-quality door won’t operate correctly if the frame isn’t level and plumb.
Follow These Steps
- Place wood shims behind each hinge.
- Check the frame with a level.
- Adjust the shims until the jamb is perfectly plumb.
- Verify the reveal (the gap around the door) is even.
- Trim any excess shim material after securing the frame.
Take your time during this step because small adjustments make a big difference in how the door operates.
Step 5: Secure the Door Frame
Once the frame is level, permanently fasten it to the rough opening.
Here’s How
- Drive long screws through the hinge-side jamb.
- Secure the latch side while checking the reveal.
- Tighten screws gradually.
- Avoid overtightening, which can twist the frame.
- Recheck the level after every few screws.
The frame should remain square throughout the installation.
If the latch doesn’t line up with the strike plate after installation, don’t panic. Small alignment adjustments usually solve the problem. Our How to Fix a Door That Won’t Latch guide explains how to correct latch and strike plate issues without removing the entire door.
Step 6: Install Insulation
Fill the gap between the door frame and the rough opening with insulation.
Best Options
- Low-expansion spray foam
- Fiberglass insulation (loosely packed)
Avoid using high-expansion foam because it can warp the frame and make the door difficult to open or close.
After insulating, trim any excess material before reinstalling the trim.
Step 7: Reinstall the Hardware
Install the remaining hardware after the frame is fully secured.
This includes:
- Door knob
- Lockset
- Strike plate
- Weatherstripping (if applicable)
Test every component before tightening the final screws.
If you’re replacing worn hardware during the installation, now is the perfect time to upgrade it. Our How to Replace a Door Knob guide walks you through installing a new knob for smoother operation and improved security.
Step 8: Test the Door
Open and close the door several times.
Check that:
- The door swings freely.
- The latch engages properly.
- The lock works smoothly.
- The reveal is even on all sides.
- The door doesn’t rub against the frame.
Any minor adjustments should be made before installing the interior trim.
If the lock feels stiff or doesn’t operate smoothly after installation, inspect the lockset before replacing it. Our How to Fix a Door Lock guide explains how to troubleshoot sticking locks, cylinders, and latch mechanisms.
Proper installation techniques help ensure a door remains level, secure, and easy to operate for years. This Old House provides practical guidance on installing doors, checking alignment, and avoiding common DIY mistakes.
Common Installation Mistakes to Avoid
Avoid these common errors:
- Skipping measurements before purchasing the door.
- Failing to check the rough opening for level.
- Using too much expanding foam.
- Overtightening installation screws.
- Ignoring an uneven reveal.
- Installing hardware before confirming alignment.
Careful preparation reduces the chance of future adjustments.
Expert Installation Tips
Professional installers recommend:
- Measure the rough opening twice before buying a new door.
- Always shim behind the hinges.
- Use long screws through the top hinge for added strength.
- Check the reveal after every adjustment.
- Test the door several times before installing trim.
These small steps can make the difference between an average installation and a professional-quality result.
To keep your new door operating quietly for years, inspect the hinges during installation and eliminate any unnecessary noise. Our How to Stop Doors From Squeaking guide explains how to prevent squeaks before they become a problem.
Applying the correct lubricant during installation can also extend the life of your hinges. Read our Best Lubricant for Door Hinges guide to choose the right product and avoid lubricants that attract dust or wear.
Pro Tip
Before installing the interior trim, leave the door closed for a few minutes and inspect the gap around all four sides. An even reveal is one of the clearest signs that the frame has been installed correctly and will help the door operate smoothly over time.
Final Thoughts
Installing a prehung door may seem like a challenging project, but careful preparation, accurate measurements, and proper shimming make the job much easier. By taking your time and checking the alignment at every stage, you can achieve a professional-quality installation that improves both the appearance and functionality of your home.
Routine maintenance after installation—including lubricating hinges, inspecting hardware, and keeping the frame in good condition—will help your new door perform reliably for many years.
Once the installation is complete, you can give the new door a fresh appearance with a quality finish. Follow our How to Paint an Interior Door guide for preparation tips, paint recommendations, and techniques that deliver professional-looking results.
FAQs
What is the difference between a prehung door and a slab door?
A prehung door comes already mounted in a new frame with hinges attached, making installation easier. A slab door is just the door panel and requires you to reuse or install a separate frame and hinges.
Can I install a prehung door myself?
Yes. If you have basic DIY skills and the proper tools, installing a prehung door is a manageable project. Careful measuring, shimming, and leveling are the keys to success.
How long does it take to install a prehung door?
Most homeowners can install a prehung door in 3–6 hours, depending on the condition of the existing frame and whether any repairs are needed.
Should I replace the trim when installing a prehung door?
Not always. If the existing trim is in good condition and can be removed without damage, you may be able to reinstall it after the new door is in place.
Do I need insulation around a prehung door?
Yes. Filling the gap between the frame and the rough opening with low-expansion foam or fiberglass insulation improves energy efficiency and helps prevent drafts.
Final Inspection Checklist
Before calling the project complete, make sure:
- The door opens and closes smoothly.
- The frame is level and plumb.
- The reveal is even on all sides.
- The latch aligns correctly with the strike plate.
- The lock operates smoothly.
- All screws are tightened securely.
- The trim fits neatly against the wall.
- Insulation and caulk have been applied where needed.
A careful final inspection helps prevent future adjustments and ensures the installation will last for years.
If the handle feels loose after reinstalling the hardware, tighten or repair it before regular use. Our How to Fix a Loose Door Handle guide explains how to restore smooth operation and prevent future wear.
For exterior prehung doors, sealing gaps is just as important as proper installation. Our How to Weatherproof a Door guide shows you how to improve insulation, reduce drafts, and increase energy efficiency.