Cold air coming through a closed window is more than an annoyance. A small gap around the sash can make a room feel uncomfortable, increase heating or cooling losses, and allow dust, pollen, insects, and outside noise into your home.
One of the simplest ways to deal with these gaps is replacing worn or missing window weatherstripping.
Weatherstripping is designed for movable joints, such as the areas where a window sash meets its frame. Unlike caulk, which seals a fixed joint, weatherstripping allows the window to continue opening and closing while reducing unwanted air movement.
The good news is that many basic weatherstripping repairs are DIY-friendly.
Quick Answer
To replace window weatherstripping:
- Find where the draft is coming from.
- Identify the type of existing weatherstrip.
- Remove the damaged material.
- Clean and dry the surface.
- Measure the window accurately.
- Cut the new weatherstrip to size.
- Install it without preventing the window from opening and closing.
The correct weatherstrip depends on your window style, the size of the gap, and how the sash moves. DOE guidance recommends choosing weatherstripping that seals the window when closed while still allowing it to operate freely.
What Is Window Weatherstripping?
Window weatherstripping is a flexible sealing material installed around moving parts of a window.
Its main purpose is to reduce unwanted:
- Air leaks
- Drafts
- Dust
- Moisture intrusion
- Outdoor noise
- Energy loss
Common materials include:
- Foam
- Vinyl
- Rubber
- Silicone
- Felt
- V-strip
- Metal weatherstripping
Different window designs require different types.
For example, a sliding window needs a seal that can accommodate movement, while a casement window may use a compression-style seal.
How Do You Know Your Window Needs New Weatherstripping?
Don’t replace weatherstripping just because the window is old.
Look for actual signs of failure.
Common warning signs include:
- Cold air around a closed window
- Visible gaps
- Cracked or flattened weatherstrip
- Missing sections
- Loose material
- Window rattling
- Increased outdoor noise
- Dust entering around the sash
- Higher heating or cooling costs
- Water entering around a moving sash
A simple draft test can help.
Close the window and slowly move your hand around the edges.
If you feel a noticeable stream of cold air, investigate the seal.
ENERGY STAR also recommends checking closed windows for drafts and using simple tests to identify air leakage around window seams.
Weatherstripping vs. Window Caulk
These two products are often confused.
Weatherstripping
Used around moving parts.
It allows the window to open and close while maintaining a seal.
Caulk
Generally used around fixed joints between materials.
If the problem is cracked sealant around the stationary exterior frame, see our guide on How to Replace Window Caulk.
If you’re dealing with water entering around the frame instead of a draft, our guide on How to Fix Water Leaking Around a Window is more relevant.
What You’ll Need
For a basic weatherstripping replacement, gather:
- New weatherstripping
- Tape measure
- Utility knife
- Putty knife
- Cleaning cloth
- Mild cleaner
- Screwdriver if required
- Scissors
- Pencil
- Gloves
Some replacement systems may require nails, screws, adhesive, or a dedicated installation tool.
Always check the product instructions before installation.
How to Replace Window Weatherstripping in 7 Steps
Step 1: Find the Draft
Start by identifying exactly where air is getting through.
Close and lock the window.
Then check:
- Top edge
- Bottom edge
- Side rails
- Meeting rail
- Corners
- Sash-to-frame contact points
Run your hand slowly around the closed window.
You can also use an incense-stick smoke test if appropriate and safe. ENERGY STAR describes this as one way to identify air movement around window seams.
Don’t Forget the Window Operation
If the window is difficult to open or close, don’t automatically install thicker weatherstripping.
Excessively thick material can make the problem worse.
If your window is already difficult to operate, check How to Fix a Window That Is Hard to Open first.
Step 2: Identify the Correct Weatherstripping
This is where many DIY repairs go wrong.
Weatherstripping isn’t one-size-fits-all.
You may find:
Adhesive-Backed Foam
Easy to install and useful for many basic gaps.
V-Strip
A flexible strip that works well in certain sash and frame applications.
Vinyl or Rubber
Durable options for many window designs.
Compression Gasket
Designed to compress when the window closes.
Metal Weatherstripping
Often found on older windows and can provide long-lasting performance.
DOE guidance notes that weatherstripping comes in different materials and should be selected according to the location, movement, weather exposure, and required seal.
Step 3: Remove the Old Weatherstripping
Carefully remove the existing material.
Depending on the type, it may:
- Peel away
- Slide out
- Be held with adhesive
- Be secured with screws
- Be installed into a groove
Use a putty knife to gently remove stubborn adhesive or debris.
Don’t force the material if doing so could damage the window frame.
For older windows, take extra care around painted surfaces.
If the home was built before 1978 and you’re disturbing old painted surfaces, lead-based paint may be a concern. ENERGY STAR advises homeowners to take appropriate lead-safety precautions before disturbing old paint.
Step 4: Clean the Surface
Before installing the new weatherstrip, clean the area thoroughly.
Remove:
- Dust
- Dirt
- Old adhesive
- Loose paint
- Grease
- Debris
Allow the surface to dry completely.
This is particularly important when using adhesive-backed weatherstripping.
A dirty surface can prevent the adhesive from bonding properly.
Step 5: Measure the Window
Measure the section where the weatherstrip will be installed.
Measure twice.
Then cut once.
This is especially important when installing adhesive-backed foam or continuous strips.
For longer sections, avoid creating unnecessary gaps between pieces.
DOE guidance also recommends measuring carefully and allowing some additional material for waste when purchasing weatherstripping.
Pro Tip
Buy slightly more material than your exact measurement.
A small amount of extra material is useful if you make a cutting mistake.
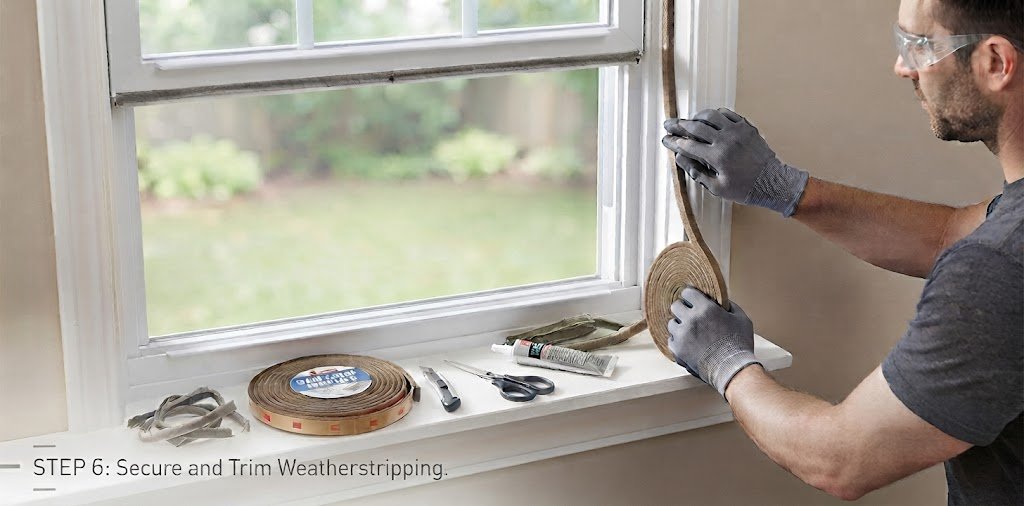
Step 6: Cut and Install the New Weatherstripping
Cut the material to the required length.
Then install it according to the manufacturer’s instructions.
For adhesive-backed products:
- Peel back a small section of backing.
- Position the weatherstrip carefully.
- Press it firmly into place.
- Continue gradually along the window.
- Avoid stretching the material unless the instructions specifically require it.
For mechanically attached products, use the supplied fasteners.
Make sure the weatherstrip sits straight and doesn’t interfere with the window’s movement.
Step 7: Test the Window
This final step is extremely important.
Close the window.
Then check:
- Does the sash close completely?
- Does the lock engage?
- Is there still a noticeable draft?
- Is the weatherstrip compressed properly?
- Does the window open without excessive resistance?
If the window suddenly becomes difficult to operate, the weatherstrip may be too thick, incorrectly positioned, or incompatible with the window.
If the window won’t close properly, see How to Fix a Window That Won’t Close.
How to Replace Weatherstripping on a Double-Hung Window
Double-hung windows have vertically moving sashes.
Weatherstripping may be installed around:
- Sash sides
- Meeting rails
- Sill
- Frame stops
The correct product depends on the window design.
Don’t simply add thick foam wherever you see a gap.
The sash must still move freely.
Older double-hung windows can also have worn balances, loose stops, or other mechanical problems that create gaps.
How to Replace Weatherstripping on a Sliding Window
Sliding windows move horizontally.
Check the:
- Sliding sash
- Vertical meeting area
- Top and bottom tracks
- Frame edges
The weatherstrip needs to accommodate horizontal movement.
Keep the track clean because excessive dirt can prevent the sash from closing tightly.
If the window itself has become difficult to operate, investigate the hardware before installing a thicker seal.
How to Replace Weatherstripping on a Casement Window
Casement windows operate differently because the sash swings outward.
They often rely on a compression-type seal around the perimeter.
When closed, the sash presses against the weatherstrip.
Check for:
- Flattened gasket
- Cracked rubber
- Missing sections
- Gaps at corners
- Damaged seals
If the weatherstrip looks intact but the window still leaks air, inspect the locking hardware and alignment.
What Happens If Weatherstripping Is Too Thick?
This is a common DIY mistake.
Thicker doesn’t always mean better.
If the material is too thick, the window may:
- Become difficult to close
- Fail to lock
- Become difficult to open
- Put excessive pressure on the frame
- Distort the sash
The weatherstrip should create an effective seal without preventing normal operation.
DOE guidance specifically notes that weatherstripping should seal when the window is closed while allowing it to open freely.
Can Weatherstripping Stop Water Leaks?
Sometimes, but only when water is entering through a movable window joint.
Weatherstripping can help resist air and water infiltration around moving components.
However, it won’t fix:
- Failed exterior flashing
- Cracked exterior caulk
- Damaged siding
- Roof leaks
- Wall leaks
- Rotten frames
- Poor window installation
If water is coming through the surrounding wall, go back to How to Fix Water Leaking Around a Window.
Can Weatherstripping Help With Window Condensation?
It can help reduce unwanted air leakage, but it isn’t a complete condensation solution.
If the main problem is moisture forming on the room-facing glass, investigate indoor humidity and ventilation.
Our guide How to Stop Condensation on Windows covers the most common causes and solutions.
Why Is My Window Still Drafty After Replacing the Weatherstrip?
If the draft remains, check:
1. The Wrong Weatherstrip
The material may not match your window design.
2. Incorrect Installation
A small gap can remain if the strip isn’t positioned correctly.
3. Window Alignment
The sash may not be pressing evenly against the seal.
4. Damaged Frame
Cracks or deterioration can create additional air paths.
5. Rough Opening
Air can sometimes enter around the window frame rather than through the moving sash.
For larger hidden gaps around the frame, DOE-backed Building America guidance discusses sealing the rough opening with appropriate materials such as caulk, low-expansion window-and-door foam, or backer rod.
Common Weatherstripping Mistakes
Using Any Foam You Can Find
Different windows require different materials.
Stretching Adhesive Weatherstrip
Stretching can cause the material to shrink back later.
Installing It on a Dirty Surface
Adhesive needs a clean surface.
Covering Drainage Holes
Don’t block designed drainage paths.
Making the Seal Too Thick
The window still needs to operate normally.
Ignoring Window Hardware
A loose latch or damaged lock can prevent proper compression.
If the lock itself is the problem, see How to Fix a Window Lock That Won’t Work.
How Often Should You Replace Window Weatherstripping?
There’s no universal replacement schedule.
Inspect it periodically instead.
Replacement is usually worth considering when the material becomes:
- Cracked
- Brittle
- Flattened
- Torn
- Detached
- Missing
- Permanently compressed
Windows that are frequently opened and closed can wear weatherstripping faster.
How to Maintain Window Weatherstripping
Once you’ve installed new weatherstrip, simple maintenance can extend its useful life.
Keep It Clean
Remove dust and dirt periodically.
Don’t Paint Over It
Unless the manufacturer specifically says the product can be painted.
Don’t Pull at It
Avoid catching it with curtains, blinds, or cleaning tools.
Check the Corners
Corners can develop small gaps first.
Test the Window
Make sure the sash continues to open and close normally.
When Should You Call a Professional?
A basic weatherstrip replacement is usually manageable for a confident DIYer.
Get professional help if:
- The frame is rotten.
- The window is badly warped.
- The sash won’t align.
- The window won’t lock.
- Water is entering the wall.
- Hidden flashing appears damaged.
- Lead paint may be disturbed.
- The window requires major disassembly.
- The draft remains after a correct weatherstrip installation.
Contractor’s Tip
Don’t use weatherstripping to hide a window that’s out of alignment.
A good seal depends on the window closing correctly.
If the sash is crooked, the frame is damaged, or the lock isn’t pulling the window tight, fix that problem first.
Weatherstripping should finish the job—not compensate for a broken window.
Final Thoughts
Replacing worn window weatherstripping can be a simple and inexpensive way to reduce drafts and improve comfort.
The most important part is choosing the correct material for your window type.
Start by finding the exact air leak, remove the old material carefully, clean the surface, measure accurately, and install the replacement without interfering with normal window operation.
And remember the difference:
Weatherstripping seals moving window parts. Caulk seals appropriate fixed joints.
Using the right material in the right location will give you a much better result than simply filling every gap with sealant.
FAQs
What is the best weatherstripping for windows?
It depends on the window design and gap. Common options include foam, vinyl, rubber, silicone, V-strip, compression gaskets, and metal weatherstripping.
Can I replace window weatherstripping myself?
Yes. Many basic adhesive-backed and replacement weatherstripping jobs are suitable for DIY homeowners.
How do I know if my window weatherstripping is bad?
Look for cracks, missing sections, flattened material, visible gaps, drafts, rattling, or air movement around a closed window.
Can weatherstripping stop window drafts?
Yes. Properly installed weatherstripping can reduce air leakage around movable window joints.
Should weatherstripping be tight?
It should create a good seal when the window is closed without making the window difficult to operate.
Can I use door weatherstripping on windows?
Not necessarily. Window weatherstripping needs to match the window’s movement and design. Always check the product’s intended application.
Can weatherstripping stop rain?
It may help around movable joints, but it won’t repair flashing, exterior wall leaks, or damaged window frames.
Why is my window still drafty after replacing the weatherstrip?
The problem may be incorrect installation, window alignment, damaged hardware, frame gaps, or air leakage around the rough opening.
How often should window weatherstripping be replaced?
Replace it when it becomes cracked, brittle, flattened, damaged, or detached rather than following a fixed calendar schedule.
Does weatherstripping help save energy?
Reducing unwanted air leakage can improve comfort and may reduce heating and cooling losses. DOE guidance identifies air leakage around windows as an energy-efficiency consideration.